I'm still working on painting all the walls, trim, doors, etc., in my basement. Sometimes I think this project will never end! One thing I've learned is that the key to a good paint job is good preparation. In fact, one of my paint advisors told me that the actual paint is just the final touch. First I have to get the walls and trim to look perfect in primer — even coverage, no unfilled nail holes, no dried-on drips from an overloaded paintbrush. Then, he said, I can add the paint.
So I've spent a lot of time sanding and spackling, priming, then sanding and spackling again. It's definitely taking over my thought processes! This weekend as I sat quietly in our church's theater-style seating, I noticed that the gentleman who was sitting in front of me had a medium-sized "dent" in his scalp. I immediately thought — now will I be able to use the Fast 'n Final lightweight spackle for that, or will I need to break out the two-stage wood filler?
But preparation is key in the appliqué world, too. It's just more fun to prepare our appliqué pieces, in my opinion! When you stitch with the freezer paper in the appliqué piece, the freezer paper helps hold the shape. Your stitched shape will look exactly the same as it did when you finished gluing under all the edges. So it's important to take special care with this step.

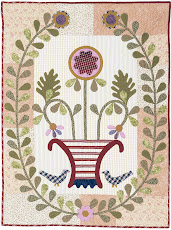
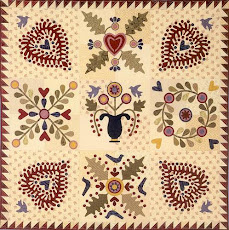
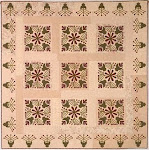
In Buttonwood Basket, the points of these rounded leaves
just touch the vine, so they have to stay sharp
to make the design work.
One of the hardest shapes to prepare is the sharp point. Sharp points are never easy, and they are a little more difficult to achieve with machine applique. Hand appliqué artists often use a 4- or 5-step process to stitch a sharp point. It takes about that many steps to prepare one for machine applique, too.
If I can get away with it, I sometimes change my quilt design to round out a point.

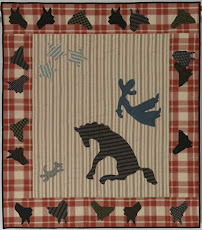
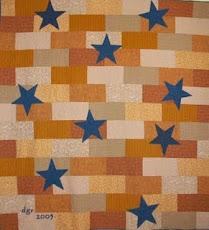
The points in Horse Play's border stars look sharp.
But because they are so large, you could
change the design to make the points slightly rounded,
and the quilt would still have the same look.
But if a sharp point is necessary, first glue the point tips under.


Turn under one side of the point, then the other. Use
a stiletto or other sharp tool to push the seam allowance
to fit within the back of the point. If you have to, trim the
extra seam allowance to make it fit.
When I finish all this painting and I have my sewing room back again, I'm going to do nothing but sew for a month! I can't wait!
Karla