Thursday, March 18, 2010

My Tessellating Quilt in William Morris Fabrics

I've always thought tessellations are interesting – I love the look of  interlocking, repeating geometric shapes. But I had stayed away from making a tessellating quilt because I didn't want to deal with all those odd-sized pieces and the mental stress of keeping the intricate color placement in order. 

So I was intrigued a few months ago when my local quilt shop owner, Michelle Klein, showed me all the tessellation projects she was working on. She had made large quilts, mini-quilts, holiday table runners, and all kinds of projects using a new acrylic ruler called the Twister tool.

The ruler comes in 2 sizes, one that starts with 10" fabric squares and one that starts with 5" squares. 
Each square is marked with 2 intersecting lines which divide the square into 4 identical odd-shaped pieces. If you cut these 4 pieces out individually, you could place them back together in a pinwheel pattern. And if you cut out a lot of these identical pieces, you could make a pinwheel tessellating quilt. A lot of cutting, and lot of keeping track of fabric placement! But....you don't have to do that. Here's what you do instead:

For a quilt made with the large Twister tool, choose the fabrics for your quilt and cut a 10" square of each. Arrange the blocks in a color pattern that you like, sew them together, then add a 6 1/2" (6" finished) contrasting border. Here's my version, made with a 10" Layer Cake set that Barbara Brackman had given me from her Morris Workshop Fabrics line from Moda.

Note: Since I was working with a charm pack, I decided to try this shaded color placement. I made a mistake, though, in choosing the border fabric. My border is the same fabric as the square in the lower left corner, and it's the same value as many of my dark squares in the outer rows of the quilt. For contrast, I should have used a border fabric from a square that didn't touch the border. Any of the inner-square fabrics would have worked.
Next, cut this quilt up!! to make the real quilt. Place the Twister tool so that the intersecting lines correspond to the seams in your first quilt. Cut all the way around the ruler. The result will be an 8" square comprising four tessellating segments, each in a different fabric. 

You'll have a small square and a "tail" leftover from each fabric. Save them for another project! For ideas, see Deb Rowden's Thrift Shop Quilts, http://debrowden.blogspot.com
After you cut, twist each block to the right so that it is straight, and sew the blocks together. Do this in an orderly fashion, so you don't get mixed up. I started at the upper left corner. At first, I cut only 2 or 4 blocks at a time and sewed them together before cutting again. As I gained confidence, I cut whole rows at a time. But I sewed each row together as soon as I cut it. When I finished 2 rows, I sewed them together, then I kept adding each row as I finished it. 

The result, a tessellating quilt with a consistent inner border all around! And made from squares with no diagonal seams to sew. (Well, the entire outer edge is on the bias. I almost forgot about that. I sewed a straight stitch all around the quilt to keep it from stretching.) I'm going to add a narrow red border and outer brown border to my quilt. It was a quick and fun project, and I think it has the potential to be a good stash buster. Sometime, I'm going to make a larger, two-color Twister quilt from my stash.
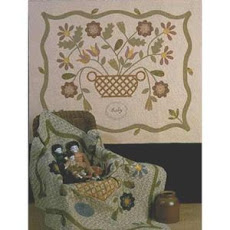
This snap didn't get the entire quilt top, but it does contain a cute back view 
of Barbara's daschund, Dottie, who seems to really like quilts.

Here's what a border block and a regular block looks like:


A side border block, above, will be half border fabric with 
2 block segments. A corner block (not shown) will be 3/4 
border fabric and 1 block segment. All the inner blocks, 
shown below, will contain 4 fabrics.


Here are a couple of links for more information:

First, the publisher of the ruler set, the Country Schoolhouse in Superior, Wisconsin. Their website has some wonderful project photos and they are an on-line source for buying the ruler, too. Note: today's blog is just an unsolicited testimonial; I had nothing to do with the creation or publication of these rulers. 
http://www.country-schoolhouse.com/kits/090209/twister_tool.htm

And a great blog on tesselations by Creative Chick sisters Leslie and Emily at http://creativechicksatplay.blogspot.com/2009/02/black-and-white-tessellation-quilt.html

And my local quilt shop, The Gathering Room in LaGrange, Kentucky. If you are in the Louisville area and love reproduction fabrics, this is a great place to shop.

Monday, March 15, 2010

Empty Nest, or New Opportunity for a Sewing Room?

Several years ago, our youngest son left for his freshman year at a college about 2 hours away. Maybe something is wrong with my maternal instincts.... Even though I did have a few teary-eyed moments when I left him at the dorms, my tears soon faded as my mind shifted to plans for turning his very large room in our basement into my new and improved sewing room.

Really, those kids don't need to have their childhood rooms preserved forever just so they can stay in them a few minutes when they come home to visit. Isn't it better for their long-term mental health if their parents set good examples by living happy and productive lives? And if changing Kyle's teenage man-cave to a sewing room would help me live a happy and productive life, then I think it was the right step to take.

So I cleared his stuff out of there, installed adjustable wire shelving in the closet all by myself, and moved my fabric stash in. Then I went to Lowes to buy three 4' x 8' sheets of insulation board. I covered the insulation boards with white batting and tacked them together along one wall to create a 12' x 8' design board that I could stick pins in. Perfect! I could put all the pieces for one or more projects on the wall with enough room to stand back, preview, and rearrange before I sewed.

I moved my cutting table, sewing table, and few other pieces of furniture in and started working. The room wasn't nearly as pretty as the quilt studios you see in magazines because of my mish-mash of furniture, but it was very user-friendly. And we have a very comfortable guest bed for Kyle to use when he comes home to visit. If it's already being used, there's a futon couch in another room. OK, no closet space in either of those rooms; they're filled with quilts. But this college boy leaves most of his clothes on the floor anyway.

So I encourage you — when those children finish high school, validate their wishes for independence by giving them a gentle shove out of the nest. When you remove their Sports Illustrated swimsuit clippings from the walls and replace them with mini-quilts, or give away the clothes they won't wear anymore so you can use the closet space for your fabric, you are showing them that you have full confidence in their new roles as responsible young adults who are learning how to live on their own.

A footnote: I wish I had a picture of my new room to show you. Well, I do, but it's not a happy one....


Two years ago, our basement's sump pump failed during one of our week-long Kentucky rainstorms. It could have been much worse, and was for many families, so I'm grateful to get off relatively easy. But it's taken a long time to deal with the damage. The resulting 3" of water ruined all the carpeting and seeped up the drywall and insulation, forcing us to remove and replace the bottom 2 feet of drywall everywhere. My fabric stash was safe because it was all up on shelves, but a few of my in-progress projects were in tote bags on the floor, and they were ruined. When the insurance money ran out soon after we paid the company that removed all the water and carpeting, plans for fixing the damage went on hold.

So, my lovely sewing room has gone unused for awhile. Except for a few little projects sewn at my dining room table, my quilting projects have been pushed to the back burner while other parts of life have taken over. Dealing with the happy and sad events that often occur in the lives of women in their 50s — family weddings, deaths, births, illnesses — has taken up much of my time and mental energy in the last two years.

And no, I don't think this is karma for taking over Kyle's room! But it is why I have been so erratic with the blogging lately. We're finally reclaiming our basement. I am so excited! But to save money I am doing all the wall preparation and painting myself. So I haven't had time to blog recently. Why is today's blog so long then, you ask? Well, because it's easier to write long than to write short. No extra time spent editing today!

Back to a happy note: Recently I made a little quilt with a new cutting tool. In my opinion, the new tool provided an easy way to make a somewhat complicated design. No appliqué involved, but I think it looks like a little fancy piecing. In a day or 2, I'll show you what I mean!

Happy trails for now,

Karla

Thursday, March 4, 2010

Split Images


One of my favorite design elements in classic floral appliqué quilts is the split leaf. Adding just a pair of split leaves to a floral arrangement adds sparkle and movement, complementing the flowers without overpowering them.


Little Betty's Garden block,  New 
Century Sampler, by Karla Menaugh


McCordsville by Barbara Brackman


     Cut Glass Dish block in Shade Garden Sampler 
     by Shauna Christensen

Adding a split leaf to your quilt block is easy. 

1. First, draw the entire leaf onto freezer paper. Add a line down the center.

2. Cut out the entire leaf, then cut it apart on the center line.

3. Iron each side of the leaf to the back of your fabric choice, and cut out with a scant 1/4" seam allowance. 

4. Fold and glue under the seam allowance all around one half of the leaf. On the other half, leave the inside seam allowance open so it can be tucked under the first half. How do you decide which side of the leaf will tucked under the other? Look for sharp points:


Sharp points are challenging in any kind of appliqué. When I have a chance to avoid folding under all the edges on a sharp point, I take it. In the case of the drawing above, Side B has a sharp point near the stem of the leaf. So I would choose to fold under the seam allowance all around Side A (except the very end of the stem, which will be tucked under the top of a flower pot), but leave the center seam allowance open on Side B. Then my sharp point would be formed by tucking the seam allowance behind Side A, instead of by folding all the fabric behind that little point.

Here's what the the leaf looks like when the edges have been folded under:


5.  Use a glue stick to glue the leaf together. It will be easier to place on the background fabric if it's in one piece.

6.  When you sew the leaf to the background, sew around the folded edges. In the above leaf, I would sew all around Side A but only around the outer edge of Side B.